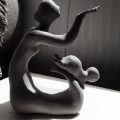

I am so excited to have finally cast the statue that my daughter, Rebekah, modeled for. It was an absolutely grueling process! But hey, it’s done and in time for Shannon and I’s graduation art gallery!
The statue was 26″ tall by 10″ wide by 8″ deep and it took 65 pound of wet plaster to cast her. I had to fill and weigh many buckets of plaster and water! Thankfully, I’ve cast several large statues now, though not so big as her. I feel pretty comfortable with plaster though. It was intimidating managing so much which is why I used a chart to calculate the volume. I was able to pour both her and the ballerinas at the same time. My biggest difficulty there was that I had a leak around the neck area and plaster started to pour out of her- much like the problem I had with the David statue. Thankfully, with this hot weather, the plaster set very quickly and it turned to pudding and stopped leaking. Yay!

I did have a real issue though with the casting. I ended up with a big air pocket in her deep chin. Her whole mouth was in that pocket. It was tricky figuring out how to put the rubber layer and the fiberglass mother mold back on the front of the statue, lean her face down, plug up the side of the chin and then squeeze in a pudding like texture of plaster, much like icing, into the cavity. I didn’t think it would actually stick to the statue but I figured I’d have a perfect mouth to glue on.

Thankfully though, it actually took! I feel like it didn’t come out perfect, but plan to do another cast after I figure out exactly where the leak is. I was afraid to maneuver or hit the mother mold with a rubber hammer to get out airbubles while I could hear plaster pouring out of the mold and into the garbage can I had propped her in to hold her up. Talk about stressful!

Sadly the plaster base that I tried to pour, broke apart completely. It’s so hard deciding what is the best time to demold. You need to take it all out soon enough to chase the plaster seams, but not so soon that 1/2″ plaster base hasn’t cured completely. So, that didn’t work. lol But she seems very steady without that, so I was able to make it work.

The silicone mold was pretty easy to do but it was my first time to use shims. I made the shims by cutting aluminum cans into strips. Be sure to cut them in the direction following the curve around the can. I tried to just some from the mouth edge to the base but then each piece had a very strong curve to it. Cutting horizontally off of circular strips resulted in flat pieces of aluminum. I should have been so much more careful putting in the aluminum can shims to avoid gaps, but the statue had aged so much that I could barely get them in. And she was so very curvy that it was about impossible.

I also had a bit of a challenge due to not making the flange walls thick enough. Lesson learned! Dye one of the sides a different color of silicone so you can tell how much of each side has been applied. My teacher, Mike, also said I needed to make the mold extend to the base. This was an afterthought since I had already started. Ugh. So I had to add a silicone layer later, and with her laying on her side so it would be easier to apply the silicone, it tended to dribble down the sides of the base. So those layers were too thin.
It was the first time I ever make such an elaborate fiberglass mothermold- so that was really the most difficult part of this whole process. Mike and I made a square mothermold for the Nani and Popi bas relief out of fiberglass the Saturday before just so I could learn the process of mold-making with fiberglass before tackling this huge and very curved and complicated shape of the Rebekah statue.

You don’t have a lot of time–maybe 15 minutes before the resin turns to jelly. I had built the cast in three sections, but each section was still a lot of square inches! It’s one thing to make a 14 x 14″ square layer times two in resin and even then, my teacher and I were working as a team. But to have this multi-width, curvy shape and do it all by myself, was just crazy – and a intimidating. I did come up with something of a system. I pre-cut as much as I could of short, medium, and long strips of fiberglass and organized them by size.

But I easily miscalculated more than once. And trying to keep puffy places coming up at the head end, while applying all this stuff to a very large 14 x 14 base, was just about impossible. Once you apply the resin and fiberglass -twice, you use your brush to press down developing air pockets so it will be strong and solid. But they popped up too fast, so I had some funny places. It still worked though so alls well that ends well on that score!

After that, I also had to clean up the raw edges and that meant wearing a mask, gloves, and working outside in the heat with a Dremel tool and two itty-bitty diamond plates. I wore them out and it was tedious work. I still ended up covered in fiberglass dust by bed time several nights in a row. I am now an expert at removing fiberglass from my skin. Yuck! But I was thrilled to be able to use it because my plaster motherhoods have not worked well at all. Fiberglass molds are so light! I hope to get a lot better at it for my next statues. It’s definitely the way to go. There are some great YouTube videos for how to do this. I tried to make legs to hold up my mold but that was a total flop. It didn’t work at all like the videos. However, another teacher told me that he turns barstools upside down and props his molds in those – that is brilliant. Garbage pails of various sizes have helped me most so far.

So after all my mishaps, I managed to cast her, repair her chin, and then I had to clean her up. Since her head had cracked at the neck quite some time ago, she was held together by a metal skewer. Unfortunately, when I removed that after applying two of the sections that cradled her head, shifted which caused the silicone to replicate a 1/2 inch gash down her neck. Sigh… Between the uneven silicone flange, which I trimmed as best I could, and the gash, I had a lot of ‘repairing’ and cleaning to do to the cast before I could stain her. I used a sharp paring knife I save for just that purpose and ‘chased the seams’ as we call it. After trimming off all the plaster seams that resulted from leaks in the mold along the seams (perfectly normal), I used spackle like you use for plaster walls, to fill in gaps. Then I sanded rough places, and filled in any air pockets with spackle also. I think I could have done a better job, but I was on a tight schedule as the piece had to be installed by Saturday afternoon.

I stained her on Saturday morning with a gallon bucket of water with about 2 tablespoons of black ink added. It made quite an interesting effect! It looks almost stone like. She still took about a week to really cure and lose some of that excess water, but she really looked quite beautiful in the gallery. My senior project as an art student was a big hit! I love her!

I will be doing at least one more plaster cast to try a different patina, and then I will attempt a concrete cast. That’s pretty hard on silicone. I will have to watch some more YouTube videos to learn about that process! But apparently Portland cement 1 is used for architectural and outdoor casts and it’s available at Home Depot. The color is very white so it’s perfect for my purposes.
So that’s the saga of my most difficult cast ever! Next time, I may just take it to the foundry and let them make the mold!


